For the last couple of years, Flutter has become one of the top cross-platform app development tools used by the best software development companies around the globe. Test-Driven Development is one of the key processes in app development that cannot be neglected. So how does TDD is performed while developing a new cross-platform app in Flutter?
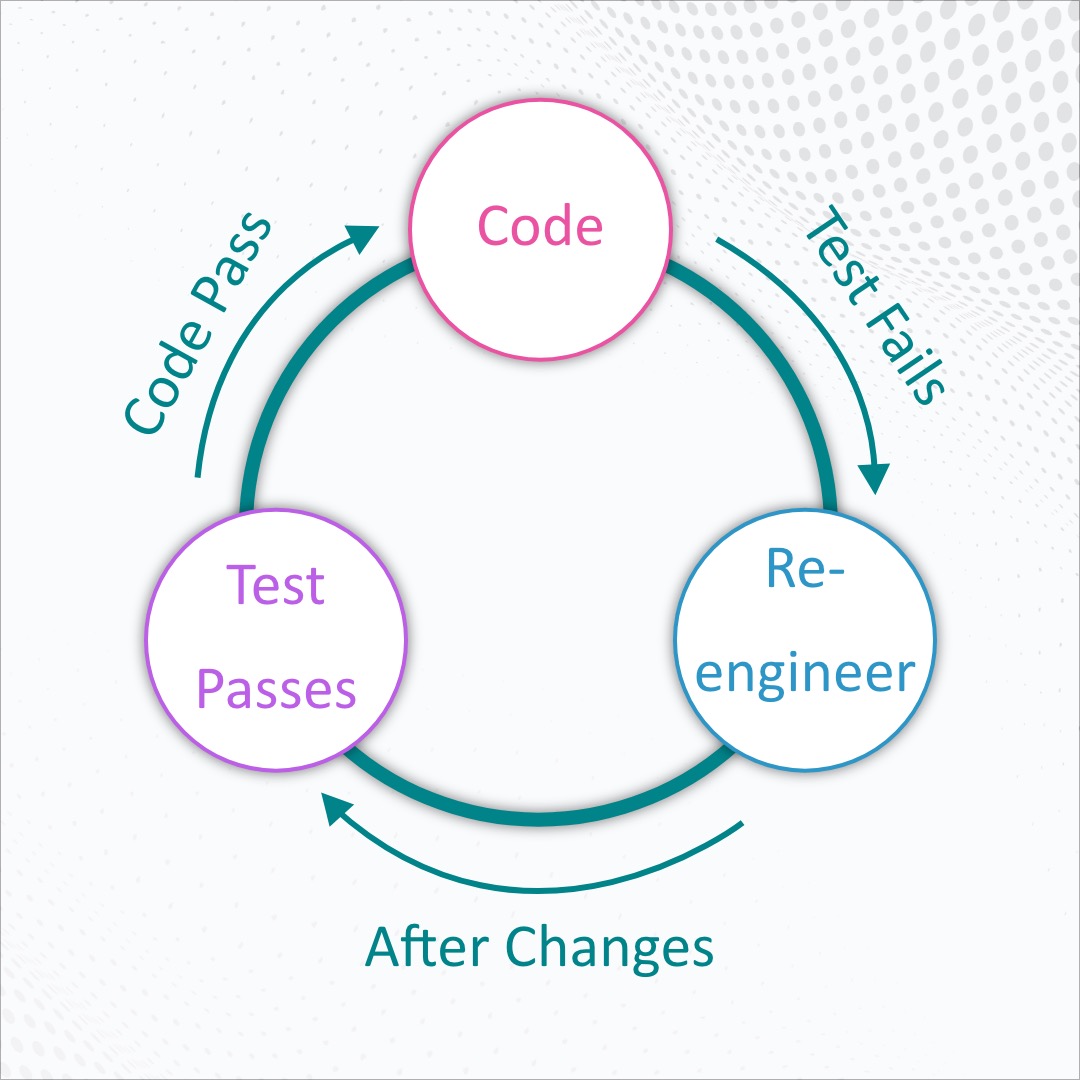
Test-Driven Development is the development process of writing test cases for a unit before writing the actual code. Initially, all the test cases will fail since there are no codes written yet. Each development cycle is then run in order to make test cases pass. Then the code is analyzed and refactored as per the requirement.
So in the following blog, we will learn how to use a Test-Driven Development technique to create a Flutter app. Get in the habit of using TDD with the Red-Yellow-Green cycle, and update your code without any worries.
Flutter test gives an overview knowledge to the person about the flutter frameworks, syntax, and architecture and their ability to understand and use widgets, features, usage of packages, and find correct solutions to real-world problems.
Flutter has three tests to pass the code for production:
Let’s understand the code of all types of testing in a flutter project.
Steps to create a test:
So let's move on to types of Testing:
For unit testing, we will use the test package of flutter. This package provides the core functionality for writing tests in Dart, making it the best approach when writing packages that are consumed by web, server, and Flutter apps
 dev_dependencies:
    test:
In this example, we will create two files:
Our counter.dart files contain two methods: increment and decrement. That is responsible for incrementing and decrementing counter value that starts from zero.
class Counter {
  int value = 0;

  void increment() => value++;

  void decrement() => value--;
}
In the counter_test.dart file, we write our first unit test.
// Import the test package and Counter class
import 'package:test/test.dart';
import 'package:counter_app/counter.dart';

void main() {
  test('Counter value should be incremented', () {
    final counter = Counter();

    counter.increment();

    expect(counter.value, 1);
  });
}
Now run our first test case with the following command: flutter test test/counter_test.dart
You should get the output in green color with +1: All Tests Passed! And if it is red, that means your test case has failed with an error.
This test determines whether the user interaction with the widget is occurring or not, and we may develop tests for all of the projects' widgets.
The below example shows the code of testing the widget 'add' icon. Whether on pressing the 'add' icon, the value of the counter gets increased or not. It also checks if the value of the counter is zero at the start.
In a test environment, the WidgetTester allows you to create and interact with the widgets.
The testWidgets() method replaces the standard test() function by automatically creating a new WidgetTester for each test scenario.
The Finder classes allow you to search the test environment for widgets.
Matcher constants, particular to widgets, help to determine if a finder has located a widget, or several widgets, in the test environment.
import 'package:flutter/material.dart';
import 'package:flutter_test/flutter_test.dart';
import 'package:flutter_unit_testing/main.dart';

void main() {
 testWidgets('Counter increments smoke test', (WidgetTester tester) async {
   // Build our app and trigger a frame.
   await tester.pumpWidget(MyApp());

   // Verify that our counter starts at 0.
   expect(find.text('0'), findsOneWidget);
   expect(find.text('1'), findsNothing);

   // Tap the '+' icon and trigger a frame.
   await tester.tap(find.byIcon(Icons.add));
   await tester.pump();

   // Verify that our counter has incremented.
   expect(find.text('0'), findsNothing);
   expect(find.text('1'), findsOneWidget);
 });
}
Integration testing, often known as graphical user interface testing, examines the entire program and devices with the needed API level.
Here we learn how to test an app with this recipe. It walks you through setting up integration tests, verifying that specified text is shown by the app, tapping specific widgets, and running integration tests.
Steps to implement the integration test:
import 'package:flutter/material.dart';
import 'package:flutter_test/flutter_test.dart';
import 'package:integration_test/integration_test.dart';
import 'main.dart' as app;

void main() {
 group('Testing App Performance Tests', () {
   final binding = IntegrationTestWidgetsFlutterBinding.ensureInitialized() as IntegrationTestWidgetsFlutterBinding;

   binding.framePolicy = LiveTestWidgetsFlutterBindingFramePolicy.fullyLive;

   testWidgets('starts with topRated', (tester) async {
     app.main();
     await tester.pumpAndSettle();

     // Movie 1
     final titleTextFinder1 = find.byKey(Key('1-title'));
     final overviewTextFinder1 = find.byKey(Key('1-overview'));
     final releaseTextFinder1 = find.byKey(Key('1-releaseDate'));
     // checking widget present or not
     expect(titleTextFinder1, findsOneWidget);
     expect(overviewTextFinder1, findsOneWidget);
     expect(releaseTextFinder1, findsOneWidget);

     // checking values
     expect((titleTextFinder1.evaluate().single.widget as Text).data, 'Fight Club');
     expect((overviewTextFinder1.evaluate().single.widget as Text).data, 'Overview 1');
     expect((releaseTextFinder1.evaluate().single.widget as Text).data, '1999-10-12');

     // Movie 2
     final titleTextFinder2 = find.byKey(Key('2-title'));
     final overviewTextFinder2 = find.byKey(Key('2-overview'));
     final releaseTextFinder2 = find.byKey(Key('2-releaseDate'));
     // checking widget present or not
     expect(titleTextFinder2, findsOneWidget);
     expect(overviewTextFinder2, findsOneWidget);
     expect(releaseTextFinder2, findsOneWidget);

     // checking values
     expect((titleTextFinder2.evaluate().single.widget as Text).data, 'Fight Club 2');
     expect((overviewTextFinder2.evaluate().single.widget as Text).data, 'Overview 2');
     expect((releaseTextFinder2.evaluate().single.widget as Text).data, '1999-10-20');
   });
 });
}
Note: Depending on the platform you're testing against, the process for conducting integration tests varies. You can test either on a mobile device or the internet.
In Mobile Apps, performance plays an important role in user experience, as users expect smooth navigating and blunder-free animation.
There are two ways to check application performance:
Developing applications with a TDD methodology is something that many developers find strange and odd initially. You may be familiar with and comprehend the Red-Yellow-Green beat and, it is still difficult to get used to. However, with time (and hopefully this blog), you will gain trust in your code, and when it's time to restructure the app, you will cherish your tests!.
We, at Seaflux, believes in for better growth and ease of running business. Have a query or want to discuss projects? Schedule a meeting with us here, we'll be happy to talk to you!

Director of Engineering