How to Integrate a ChatGPT AI Chatbot with WhatsApp Easily
In today's world, messaging apps are becoming increasingly popular, with WhatsApp being one of the most widely used. With the help of artificial intelligence, chatbots have become an essential tool for businesses to improve their customer service experience. Chatbot integration with WhatsApp has become a necessity for businesses that want to provide a seamless and efficient customer experience. ChatGPT is one of the popular chatbots that can be integrated with WhatsApp for this purpose. In this blog post, we will discuss how to integrate ChatGPT with WhatsApp and how this chatbot integration with WhatsApp can benefit your business.
Prerequisites:
Before we begin, here are the prerequisites for integrating ChatGPT with WhatsApp:
- A WhatsApp Business Account
- Access to WhatsApp Business API (Meta developer account)
- A ChatGPT account and Token
- Access to ChatGPT API
- A server to host the chatbot
WhatsApp Business API
To get the WhatsApp Business API, follow the below steps:
- Login on Meta developer
- Click on MyApp from the navigation bar
- For first-time users, click on Create App and fill required fields
- Add products as WhatsApp Business Account webhook
- Add webhook URL(Server side) and Token
- Refer to the API documentation for send and receive message
Note: WhatsApp Business is a free-to-download app that offers paid services for businesses to use on a live or production basis. In order to use these paid services, businesses need to set up a payment method. However, WhatsApp offers a free trial period for businesses to test out the paid services. During the trial period, businesses can send up to 200 free messages per day on testing accounts. Once the trial period is over, businesses will need to pay to continue using the paid services.
Server
To connect the WhatsApp app, we need to set up a basic Node.js-based server environment. Once the server is set up, we can create a webhook route that listens to the app's activity and performs operations accordingly.
Note: WhatsApp webhooks require HTTPS. If you're testing locally, you can use Ngrok to create an HTTPS connectionChatGPT
To obtain chatgpt api access, you need a secret key for authentication to access the ChatGPT API. To acquire the secret key, log in to ChatGPT and click on 'Profile' after a successful login. From there, navigate to 'View API keys,' where you can find any existing API keys. This is where you can obtain the secret key necessary for chatgpt api access.
To generate a new API key for chatgpt api access, click on 'Create a new secret key.' This will create a new API key that you can copy and safely store as the secret key will not be visible after closing the pop-up. You can create multiple secret keys for chatgpt api access, and all of them can be accessed as needed.
Integration
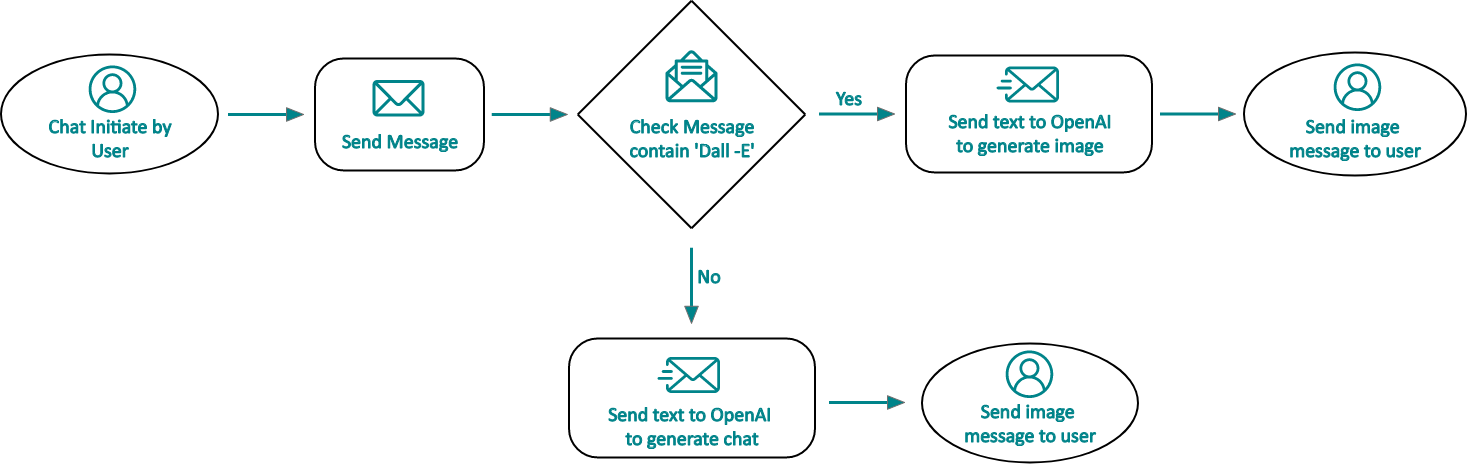
To learn how to integrate ChatGPT with WhatsApp, we need to define a message template that specifies whether we want a text or image response from ChatGPT. To simplify the user experience, we will create a command called 'Dall-e.' If a WhatsApp message begins with 'Dall-e,' then it will trigger an image response. Otherwise, it will trigger a text response. This method will allow us to easily identify which message is for which response and easily integrate ChatGPT with WhatsApp.
For the above condition let’s see how to define it on the server side:
First, we read a message from WhatsApp, the below code helps with that.
Export const getMessage = async (request: FastifyRequest, reply: FastifyReply) => {

Let body: object = request.body;
Let to: string = ‘ ‘;

if (body.object) {
       if (body.entry &&
           body.entry[0].changes &&
           body.entry[0].changes[0].value.messages &&
           body.entry[0].changes[0].value.messages[0]
       ) {
           let phoneNumberId = body.entry[0].changes[0].value.metadata.phone_number_id;
           let receiverPhoneNumber = body.entry[0].changes[0].value.metadata.display_phone_number;
           let message = body.entry[0].changes[0].value.messages[0].text.body;
           message = message.toLowerCase();
          }
The above code separates the message, and we determine whether the message is for a text service or an image-based service.
if (message.match('dall-e')) {
	to = body.entry[0].changes[0].value.messages[0].from;
    const prompt = message.split("dall-e")[1];

    const response = await openai.createImage({
    	prompt: prompt,
        n: 2,
        size: "1024x1024",
        });

	} else {
		const completion = await openai.createChatCompletion({
        	model: "gpt-3.5-turbo",
            messages: [{role: "user", content: message }],
           });
        console.log(completion.data.choices[0].message);
    }
This is how we identify whether the user wants to ask a question or create an image. After identifying the message, we can ask ChatGPT to fetch the response. However, we need to import and configure OpenAI before making the request to ChatGPT.
Please refer to the code below for the necessary imports and configuration:
const { Configuration, OpenAIApi } = require("openai");

const configuration = new Configuration({
          apiKey: process.env.OPENAI_API_KEY,
          });
const openai = new OpenAIApi(configuration);
Parameters and Responses
Below parameters are passed to ChatGPT and accordingly we get responses from ChatGPT:
For Image:
Parameters:
{
  "prompt": "A cute baby sea otter",
  "n": 2,
  "size": "1024x1024"
}
prompt is a string and required
- A text description of the desired image(s). The maximum length is 1000 characters.
n is an integer and optional, the Default value is 1
- The number of images to generate. Must be between 1 and 10.
size is string and optional, Default is 1024x1024
- The size of the generated images. Must be one of 256x256, 512x512, or 1024x1024.
response_format is string and optional, Default is URL
- The format in which the generated images are returned. Must be one of URLs or b64_json.
user is string and optional
- A unique identifier representing your end-user, which can help OpenAI to monitor and detect abuse
Response:
{
  "created": 1589478378,
  "data": [
    {
      "url": "https://..."
    },
    {
      "url": "https://..."
    }
  ]
}
For Chat:
Parameters:
{
  "model": "gpt-3.5-turbo",
  "messages": [{"role": "user", "content": "Hello!"}]
}
model is string and required :
ID of the model to use. See the model endpoint compatibility table for details on which models work with the Chat API.messages are array and required :
The messages to generate chat completions, in the chat format.To tweak the response you can use optional parameters. Check here for complete list of optional parameters.Response:
{
  "id": "chatcmpl-123",
  "object": "chat.completion",
  "created": 1677652288,
  "choices": [{
    "index": 0,
    "message": {
      "role": "assistant",
      "content": "\n\nHello there, how may I assist you today?",
    },
    "finish_reason": "stop"
  }],
  "usage": {
    "prompt_tokens": 9,
    "completion_tokens": 12,
    "total_tokens": 21
  }
}
Send Message:
Finally, we need to send the response to the user, whether it is a chat or an image. As the WhatsApp API reacts differently to text and images, we need to use a separate body structure for each type of response. The code below provides the necessary structure for sending both chat and image responses:
For Image/Media:
try {
 	const { data } = await axios.post(
    "https://graph.facebook.com/v15.0/" + phoneNumberId + "/messages",
    {
    	messaging_product: "whatsapp",
        to: to,
        type: 'image',
        image: {
        	caption: "CAPTION",
            mime_type: "image/jpeg",
            sha256: "IMAGE_HASH",
            id: "ID"
            }
    },
    {
       headers: {
       		"Content-Type": "application/json",
            "Authorization": `Bearer ${process.env.Token}`
                 },
    },
    };
     console.log(JSON.stringify(data, null, 4));
     if (data) {
     	reply.status(200);
	  }
     } catch (error) {
     	if (axios.isAxiosError(error)) {
        	console.log('error message: ', error.message);
            	reply.status(400).send(error.message);
        } else {
        	console.log('unexpected error: ', error);
                }
    }
For Text
try{
	const { data } = await axios.post(
    	"https://graph.facebook.com/v15.0/" + phoneNumberId + "/messages",
        {
        	messaging_product: "whatsapp",
            to: to,
            type:'text',
            text: {
            	body: `${completion.data.choices[0].message.content}`
                   }
        },
        {
        	headers: {
            	"Content-Type": "application/json",
                "Authorization": `Bearer ${process.env.Token}`
                      },
         },
     };

     	request.log.info(JSON.stringify(data,null,4));
        if(data){
        	reply.status(200).send({message:"message send successfully"});
            }
        } catch(error){
        	if(axios.isAxiosError(error)){
            	request.log.error('error message: ', error.message);
                	reply.status(400).send(error.message);
            } else{
            	request.log.error('unexpected error: ', error);
                   }
    }
In the above code, we have used Axios to send the message to the user, while for the OpenAI request, we did not use Axios as OpenAI is handling the request on its own. However, for sending messages through WhatsApp, we need to manage it ourselves as there is no inbuilt functionality, and therefore, we will use Axios.
End Note:
We can use this approach to create a versatile and engaging chatbot that can assist with various tasks, such as finding recipes for cooking, composing emails, and coding. With its interactive interface, the chatbot can streamline these processes and provide users with a more efficient and enjoyable experience.
We have also uploaded all the codes on our GitHub Repository head on to have access.We, at Seaflux, are AI & Machine Learning enthusiasts, who are helping enterprises worldwide. Have a query or want to discuss AI projects where AI can be leveraged? Schedule a meeting with us here, we'll be happy to talk to you.

Krunal Bhimani
Business Development Executive