Step-by-Step ERC20 Token Development and Smart Contract Guide
Cryptocurrency has revolutionized the way we conduct transactions, making the old methods of transferring money seem somewhat outdated in comparison. Governments are still a little scared of it, but as we see more cities and organizations using cryptocurrencies for paying salaries, we can see that money-in and money-out is not just the future of digital finance - it's our present, as the world is living it.
But have you ever wondered how cryptocurrencies are actually created, or more technically, how they are coded? Many people search for how to create a cryptocurrency, and at Seaflux, our experts have crafted this blog for enthusiasts curious about building their own cryptocurrency. Additionally, with the rise of Blockchain as a service (BaaS) platforms, businesses and developers can now experiment with blockchain solutions and crypto projects without building the infrastructure from scratch.
In this guide, we’ll cover:
- A basic understanding of blockchain technology in cryptocurrency
- How cryptocurrency works
- The difference between tokens and coins
- A step-by-step process to create your own ERC20 token using Ethereum’s ERC20 standard
- Fundamentals of token creation and how to create crypto token
Basics of ERC20 token development
CryptoCurrency 101
Cryptocurrency, usually called crypto, is a kind of digital or virtual exchange that uses cryptography for security, as well as other features that make it decentralized. With a crypto exchange, there are blocks of transactions verified on a blockchain. Since there is no bank overseeing the transaction, the bank being the central governing authority, the transactions are verified on the blockchain, and any changes to the ledger structure are immutable. So it is secure, and there is hope that the technology can be developed to make it transparent, as the transactions will eventually be recorded on a blockchain. This peer-to-peer system is also the foundation of decentralized finance (DeFi), where users can interact directly without intermediaries like banks.
For enterprises and developers, blockchain as a service (BaaS) provides ready-to-use infrastructure, allowing them to experiment with blockchain applications and integrate secure cryptocurrency solutions without managing the underlying technology. This includes creating and deploying Solidity smart contracts efficiently for various use cases, including simplified token creation and the ability to easily create crypto token, and full-scale ERC20 token development.
As a P2P crypto transaction system, cryptocurrency allows users to send and receive payments globally in real-time. Unlike cash, cryptocurrency transactions are only online, existing solely as entries and are secured on a public blockchain ledger. Users will navigate their transactions through a cryptocurrency digital wallet (also called a crypto digital wallet). A digital wallet is linked to their payment method with advanced cryptographic coding for storing, transmitting, and protecting data. Strong encryption gives users safe, dependable, and secure blockchain payments.
How does CryptoCurrency work?
Cryptocurrencies have a distributed public ledger called a blockchain, which records and verifies the transference of cryptocurrency. The blockchain is constantly updated by holders of the currency. New units of cryptocurrency are created through a process called crypto mining. The process of crypto mining is done using huge, powerful computers that solve complicated math equations in order to build coins. In addition to crypto mining, users can purchase cryptocurrency from brokers and can store or spend cryptocurrency safely using a crypto digital wallet, which provides secure access to private keys and transactions.
You own no physical product when purchasing cryptocurrency. You hold a private key, a unique string of digital code that allows you to convey ownership of units of crypto from party to party without the need for a bank or trusted third party. Cryptocurrencies allow for financial interaction in a peer-to-peer way, which is transparent, secure, and independent a principle that also powers modern decentralized finance applications and decentralized applications (dApps).
Token vs Coin Comparison
When exploring cryptocurrency, one of the most common questions people ask is about token vs coin: what’s the real difference? Coins and tokens are similar at a fundamental level since both represent value and can be used to process digital payments. In many cases, you can even swap coins for tokens and vice versa, depending on the platform.
Coins and tokens are seized primarily on their functional purpose in the comprehensive cryptocurrency ecosystem. Tokens fulfill functions such as governing proposals, staking, access to dApps, and other functions that coins do not offer. This versatility is what makes tokens a critical component of decentralized finance and Tokenomics, as they can represent everything from governance rights to real-world assets, and even power decentralized applications on blockchain networks.
Here is a practical breakdown comparing Coins and Tokens:
Simply put, a token represents what you own, while a coin denotes what you're capable of owning.
Another interesting thing about tokens is how easy it is to create one. Some networks, like Ethereum, provide templates where you can brand your tokens and start trading. So anyone with little to no technical knowledge can become a market maker and even learn how to create cryptocurrency step by step. With standards like the ERC20 token model, developers can quickly launch digital assets that are compatible with wallets and exchanges.
Businesses can leverage blockchain as a service (BaaS) and Solidity smart contracts to simplify token creation and easily create crypto token, allowing them to focus on tokenomics and adoption without managing infrastructure.
Additionally, when working with smart contracts and ERC20 tokens, understanding how blockchain networks handle microtransactions is essential. Even small leftover balances, often called crypto dust, can accumulate and cause inefficiencies. Our blog on How Gas Station Helps Save Crypto Dust on Blockchain Platforms explains how gas station mechanisms streamline these minor transactions and optimize gas usage across blockchain applications.
Need to launch a token for your project — with legal compliance, smart contract auditing, and multi-chain support? That's what Seaflux's blockchain team does. Get a free scoping call →
Creating your own Token
The token will be a standard ERC20 token, where you’ll set a fixed amount to be created, and it won’t have any fancy rules. I'll also show you how to get it verified so that it's legitimate. If you’ve been wondering how to create your own cryptocurrency, this section will give you a practical, beginner-friendly process, while also highlighting the basics of token creation, ERC20 token development, and Tokenomics, the economic model that defines how your token will be distributed, used, and sustained in the market.
Beyond ERC20 tokens, blockchain also enables unique assets like NFTs, which represent ownership of digital art, collectibles, or other assets. If you’re interested in learning how NFT minting works and how digital ownership is secured with blockchain, you can explore our blog on NFT Minting and Digital Ownership Explained with Blockchain.
What is ERC20?
ERC20 is the recognized official token standard on the Ethereum (ETH) blockchain and has an intended purpose of designing and maintaining tokens. The acronym ERC means "Ethereum Request for Comment," and 20 represents the unique proposal identifier.
An ERC20 token follows a standardized protocol for design and usage, ensuring tokens adhere to the same set of rules and can be used interchangeably. This has made ERC20 tokens extremely popular in the cryptocurrency ecosystem.
The Ethereum token standard defines rules for developers to follow to create tokens that will be compatible with other tokens across different backgrounds. Because of this, crypto wallets and cryptocurrency exchanges can integrate ERC20 tokens with ease, allowing for fast transfers of tokens to trading platforms and seamless conversion into other cryptocurrencies.
Steps to creating the token
Step 1: Decide what you want your token to be
To create an ERC20 token on the Ethereum blockchain, you first need to define some essential details. These include:
- The Token’s Name
- The Token’s Symbol
- The Token’s Decimal Places
- The Number of Tokens in Circulation
For example, while building The Most Private Coin Ever, I defined the following token parameters:
- Name: Seaflux
- Symbol: SFT
- Decimal Places: 18
- Amount of Tokens in Circulation: 100,000
The choice of decimal places in cryptocurrency tokens can be a little tricky. Most ERC20 tokens deal with 18 decimal places, which allows transactions as low as 0.0000000000000000001 tokens. However, I mean make sure the number of decimals you pick fits the greater use case and purpose of your crypto project.
In my case, I wanted to keep the system simple, and users would either own a whole token or not. I added my token with 0 decimal places. Alternatively, you could choose 1 decimal place to allow fractional ownership (like half a token), or stick to 18 decimal places, which is the industry standard for Ethereum-based tokens.
Alternatively, you could choose 1 decimal place to allow fractional ownership (like half a token), or stick to 18 decimal places, which is the industry standard for Ethereum-based tokens.
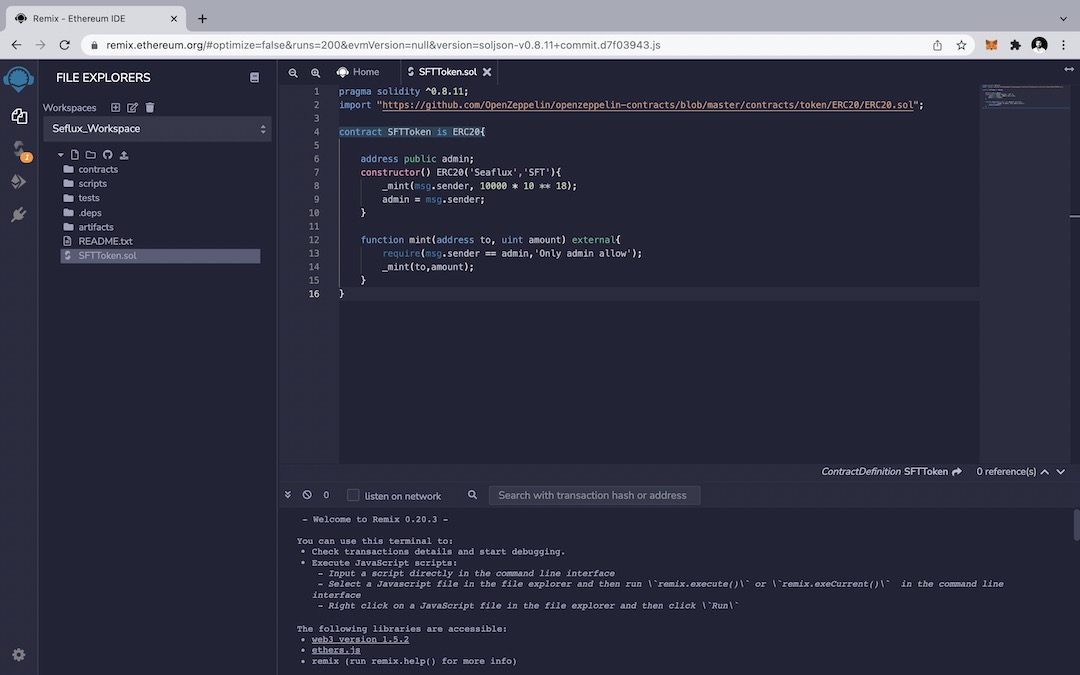
Step 2: Code the Contract
Here is a contract you can "Copy/Paste" to create your ERC20 token. Shoutout to TokenFactory for the source code.
pragma solidity ^0.8.11;
Import “https://github.com/OpenZeppelin/openzeppelin-contracts/blob/master/contracts/token/ERC20/ERC20.sol”;

contract Seaflux_Token is ERC20 {
    address public admin;
    constructor () ERC20('SeaFlux','SFT'){
        _mint(msg.sender,100000 * 10 ** 18);
        admin = msg.sender;
    }

    function mint(address to, uint amount) external{
        require(msg.sender == admin, 'Only admin allow');
        _mint(to, amount);
    }
}
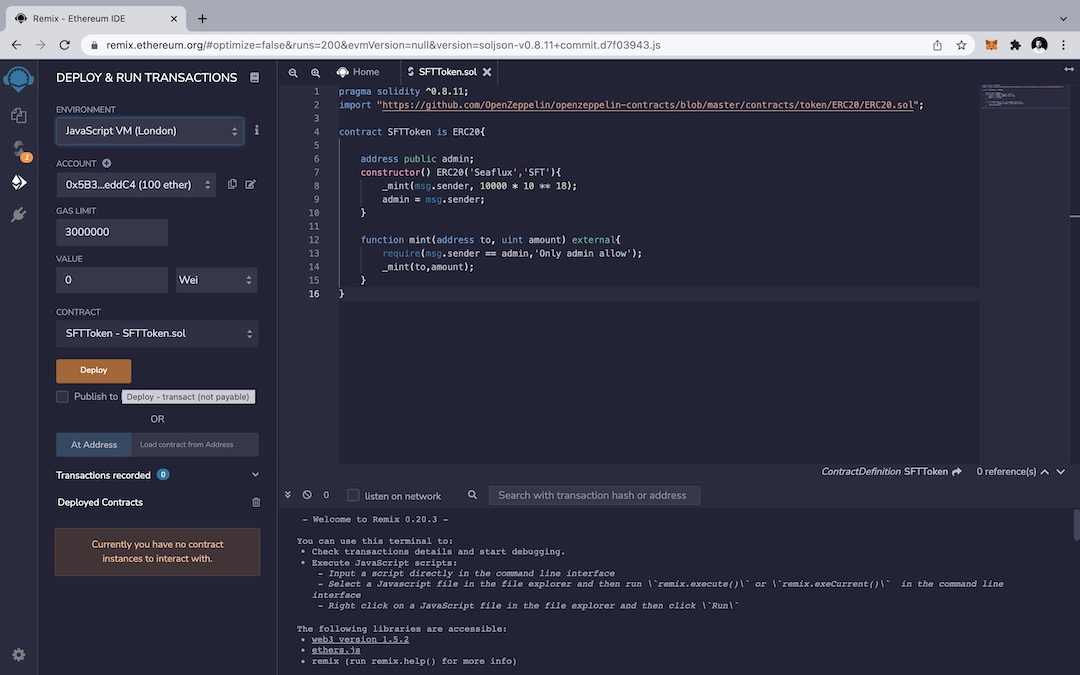
Throw this into your favorite text editor (Remix IDE is my personal favorite).

Now go to settings on the right, and select the latest release compiler version (NOT nightly), as well as check ‘Auto Compiler’.

Edit the code according to the following particulars:
- The token name
- The token symbol (I'd go no more than 3 characters here)
- The token decimal places. How much do you, as the owner, want to start with?
- The number of tokens in circulation (to keep things simple, let's make this the same amount as the owner supply)
Some things to keep in mind:
- The token supply and decimal places in ERC20 tokens are directly related.
- Example: If you want 100 tokens with 0 decimal places, the supply will simply be 100.
- But if you want 100 tokens with 18 decimal places, the supply must be written as 100000000000000000000 (adding 18 zeros).
- You set the number of tokens you receive as the creator of the contract.
That’s what this line of code is:
balances[msg.sender] = NUMBER_OF_TOKENS_HERE;
This ensures the specified total token supply is sent to your Ethereum wallet upon deploying the contract.
To make things simple, you can set this equal to the total supply so that you, the creator of the token, receive all of the tokens at the outset. You can also create advanced token distribution logic if you want to divide the tokens into portions to distribute to project founders, team members, and early investors.
After setting all of the variables, it is time to deploy the ERC20 token smart contract to the Ethereum blockchain (or your test network) and test your ERC20 token.
Step 3: Test The ERC20 Token on The TestNet
Before deploying your ERC20 token smart contract on the Ethereum MainNet, it’s important to first test it on a test network (TestNet). This stage helps avoid wasted cost because deploying directly to the MainNet requires actual ETH to cover gas fees and could be both costly and frustrating if a contract fails.
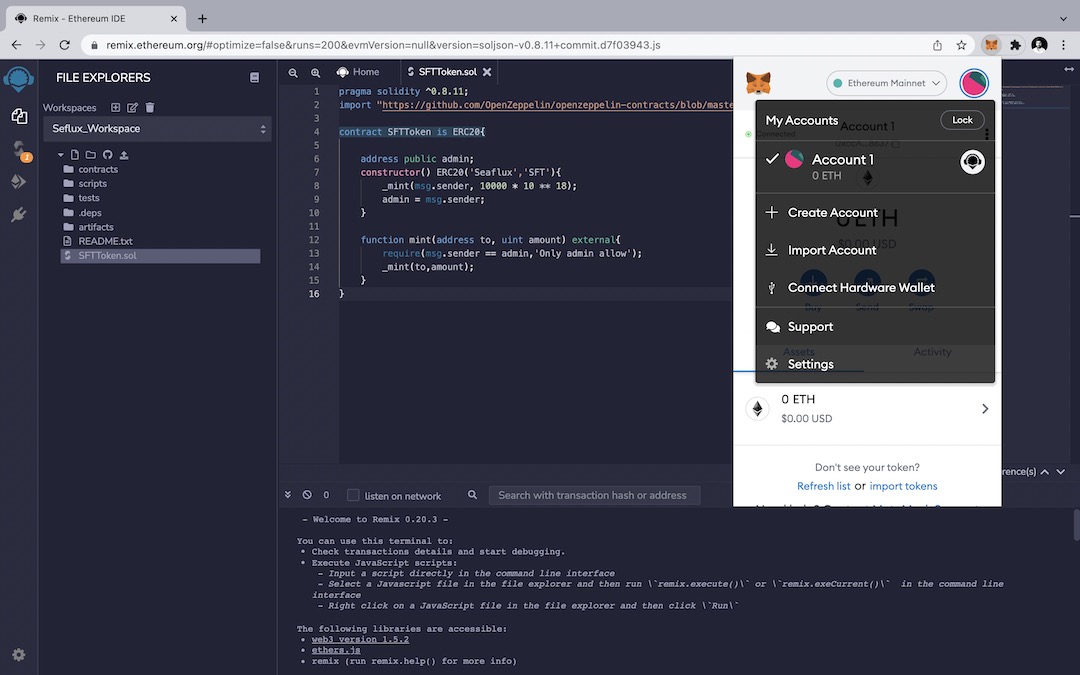
Using MetaMask to Deploy on the TestNet
If you don't have it yet, download and install the MetaMask crypto wallet, which offers an easy-to-use interface for testing and deploying Ethereum smart contracts.
- Log in to MetaMask after installation.
- Change from the Main Ethereum Network to the Ropsten Test Network (or other test networks like Goerli or Sepolia).
- Click on the dropdown at the top of the MetaMask window to alter and select the Ropsten Test Network.
- Once connected, you will see confirmation that MetaMask has switched to Ropsten. This means you are ready to test the deployment of your ERC20 token and earn some test ethers in the process.
To be sure, the top of your MetaMask window should look like:
Go to the advanced settings option and enable the Show test networks
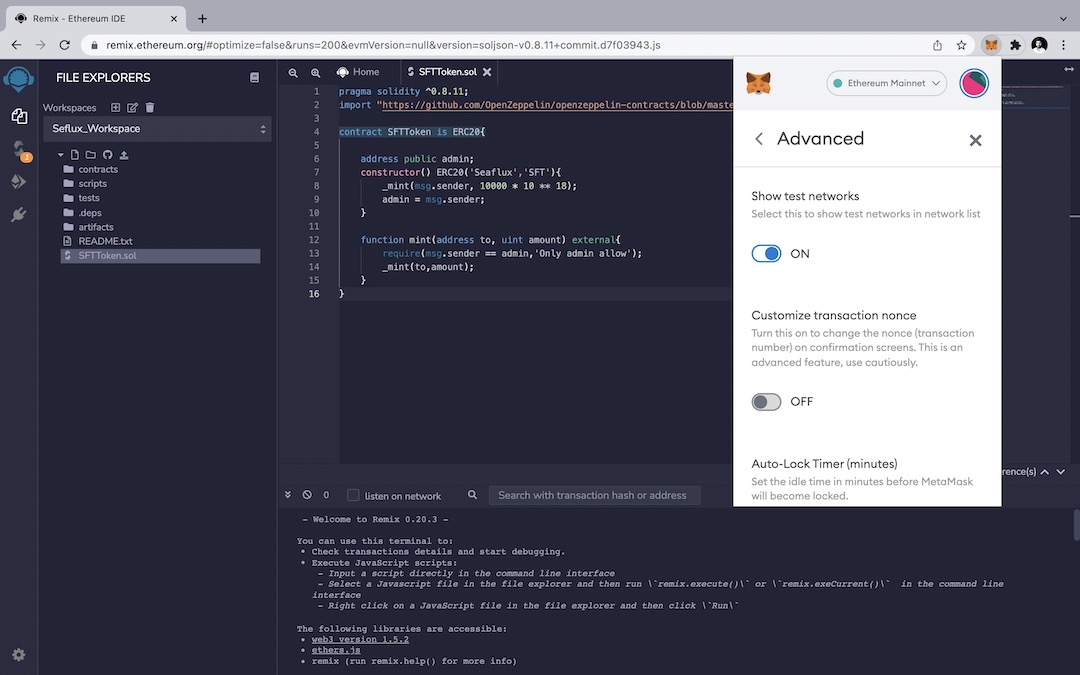

This wallet will be the ‘Owner’ of the contract, so don’t lose this wallet! If you don't like MetaMask, you can use Mist or MyEtherWallet instead, whichever seems best. I recommend using MM for simplicity, and you can always export your private key to MyEtherWallet for later usage.
Keep note of the current Solidity version in the compiler. We’ll need that later to verify the contract source.
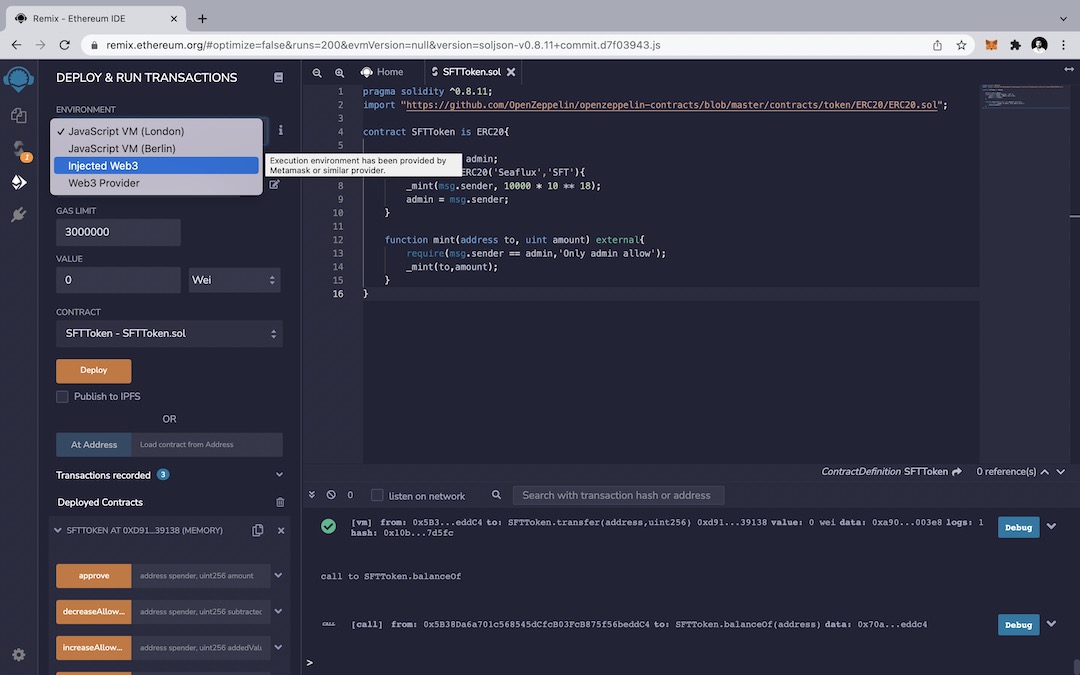
Now go to the DEPLOY & RUN TRANSACTIONS tab and select the environment. The first two options are remix test network-based, the third one is the wallet test network, and the last one is used to deploy on the main network. After that, hit the deploy button to deploy the contract on the Remix test network.
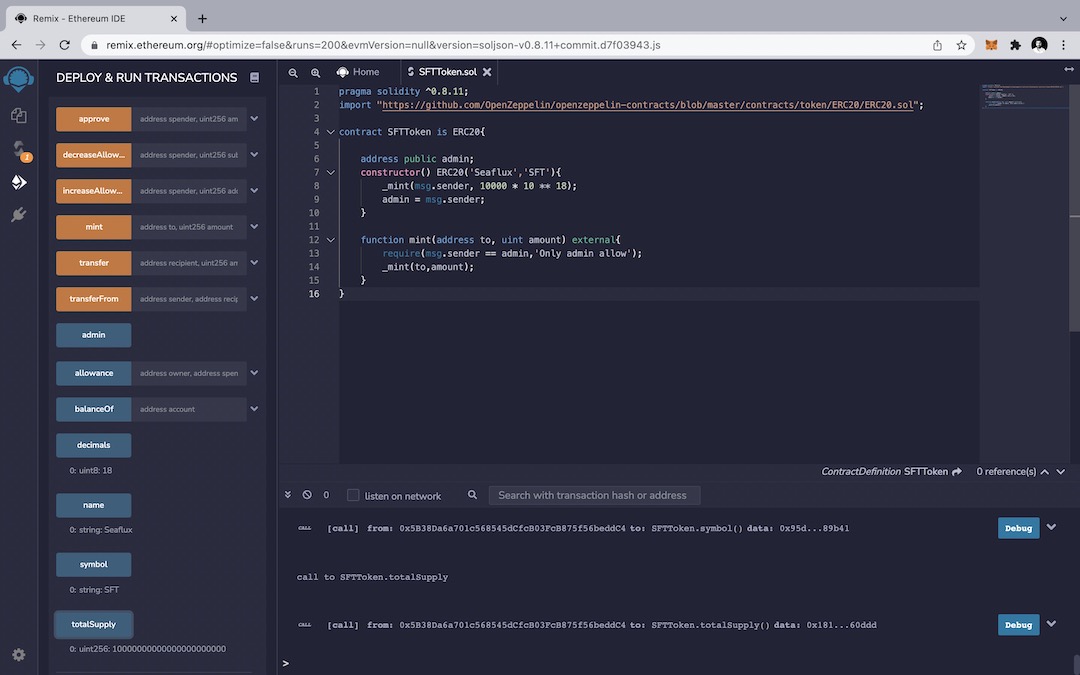
After successfully deploying a contract on the remix test net, get the option below in the deploy contract, where it can show all the details of the token.
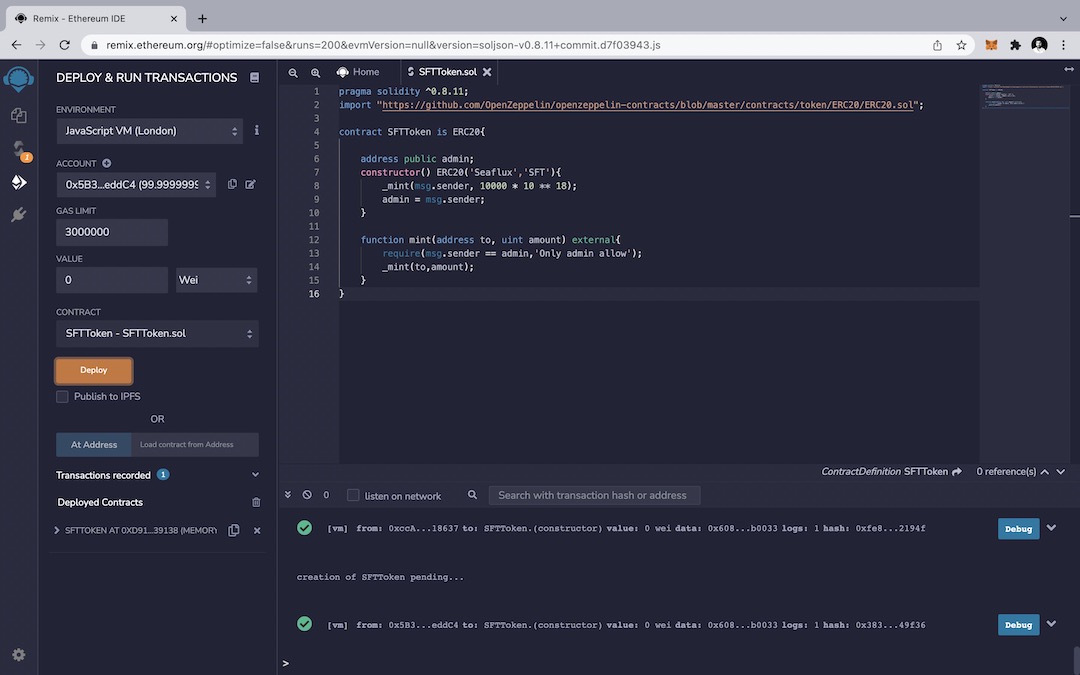
Above image is for successful deployment.
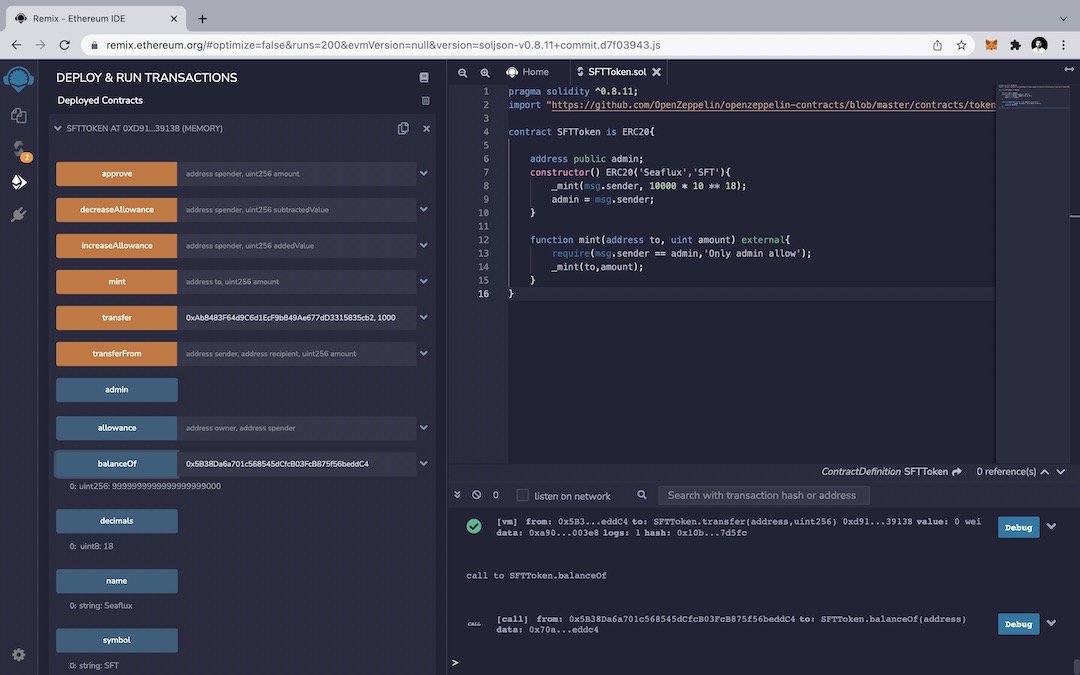
To transfer the token, you need to select the receiver address. Go to the account, choose another one to copy the address where you want to send the token. Reselect the original account from which you want to send the token. Now go to the transfer option, paste the receiver account that you copied previously along with the amount of token by separating the comma, and click on the transfer option. The receiver will receive the number of tokens that the sender transferred.
After the receiver receives the token, it can use it to transfer it to another account and send it to the sender account.
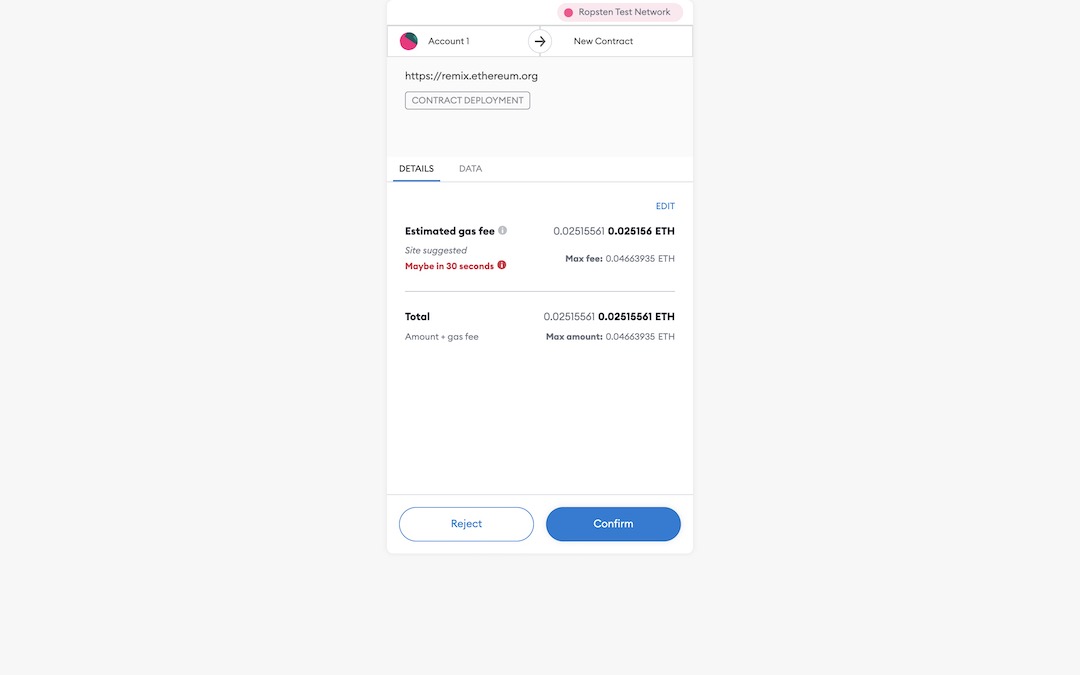
To connect with the MetaMask wallet, you need to change the environment. Go to DEPLOY & RUN TRANSACTIONS and change the environment to Injected web3. Now, the MetaMask will give you a pop-up asking you to hit ‘Submit’ to pay for the transaction.
Remember, this is the Ropsten test net, so it’s not real Ether. You can double-check to make sure you’re on the test network in MetaMask before you hit submit.
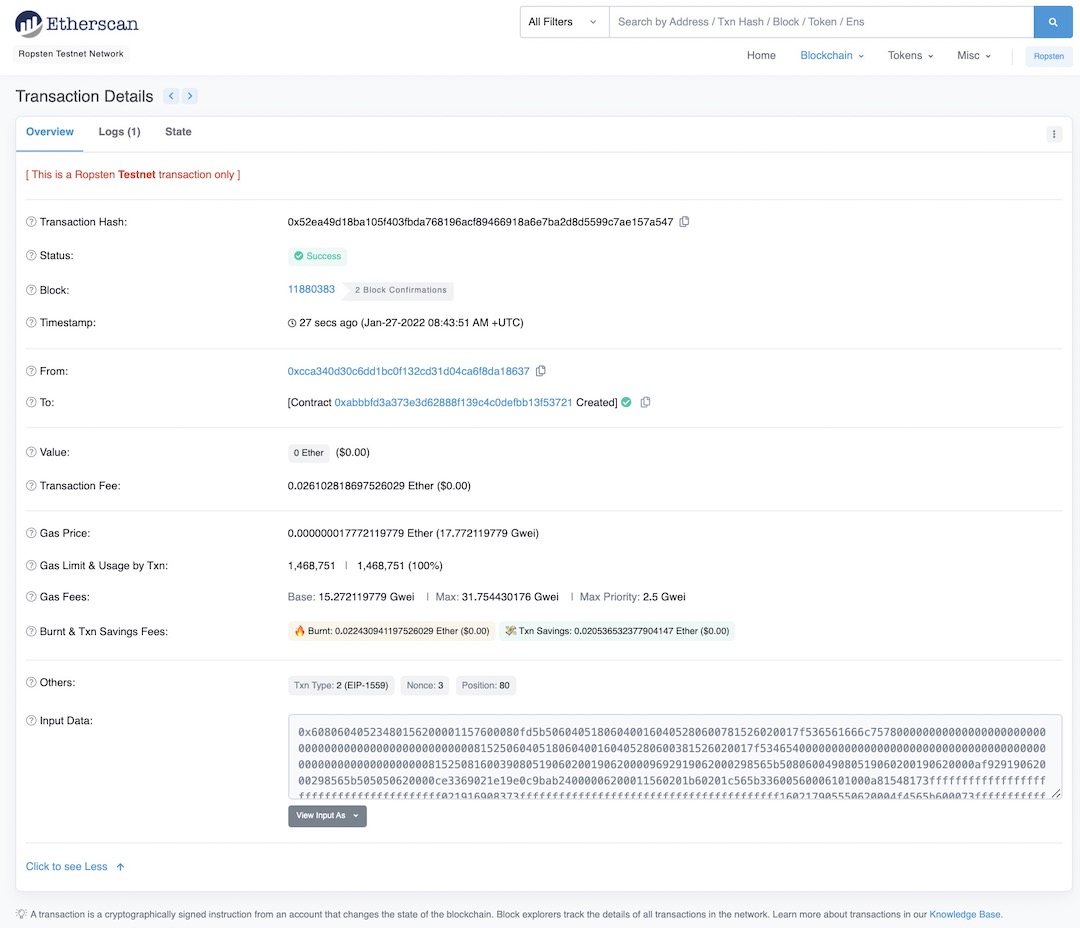
When you hit Submit, it’ll say ‘Contract Pending’ in MetaMask. When it’s ready, click the ‘Date’, and it’ll bring up the transaction in EtherScan. Like this:
If this process works, the next step is to verify the source code. If not, you need to go back to the code and modify the source to get it to work.
I can’t say what exactly it would look like; this is where having a “programmer's mindset” comes in. Many a time, unexpected bugs would pop up that can’t be predicted until you try.
Step 4. Get the token to the wallet
Copy the contract address listed in the transaction information (see screenshot above). In this case, it’s 0x5xxxxxxxxxxxxxxxx.
I’m going to add that to MetaMask ‘Tokens’ tab:
Paste the token name and symbol and click on the import button. Refresh the crypto digital wallet to see the token.
Step 5. Verify the source code
Validating your ERC20 token smart contract is vital when creating trust and transparency with the public. Your token will still function without a verification; however, it is very important to publish the source code so users can verify the contract is real and know that you are not doing anything shady.
How to Verify Your ERC20 Token Contract on Etherscan
- On the transaction screen from the previous step, locate the ‘Contract’ tab next to Transfers.
- Click on “Verify and Publish Contract Source Code.”
- A new window will open asking for details about your contract, including:
- Contract Address
- Compiler Type
- Compiler Version
- License Type
- Fill in all the required fields as per your contract configuration.
- After clicking Continue, the system will prompt you to upload your contract file. After downloading the file from Remix IDE, upload it here and then finish the process by clicking Verify.
Once verified, I will publish your token on Etherscan, which means anyone can see the source code, transactions, and verify your token. This will not only add credibility but also make your project much more appealing for both investors and users.
After clicking Continue, the system will prompt you to upload your contract file. After downloading the file from Remix IDE, upload it here and then finish the process by clicking Verify.
Step 6. Get it on The Main Net
Now that everything is working, it’s time to deploy it on the MainNet and let other people use it.
This part is simple.
Just do steps 3 & 4, with the network connected to the MainNet. Make sure your MetaMask account is in Mainnet mode. You’ll need to fund your contract with real Ether to do this.
“Congratulations! You’ve successfully deployed your Token on the Main-Net.”
We have gone through what cryptocurrency is and how blockchain technology works, and the various types of cryptocurrencies that are available in the market. We also went over the different crypto coins and tokens, as well as the step-by-step process to create cryptocurrency using Ethereum’s ERC20 standard. In summary, the token creation process entails: Name → Code → Test → Get → Verify → Deploy.
Since you already grasp the basics of creating and deploying a token on the Ethereum blockchain, you can engage in live and direct experiments, customize tokens, build decentralized applications, create your own cryptocurrency, and even deploy tokens in the crypto market. Reach out if you run into issues during the token development or deployment stage!
Blockchain, Smart Contract & Token Development Services
At Seaflux, we are blockchain enthusiasts providing comprehensive blockchain development services to enterprises worldwide. Our expertise includes smart contract development, enterprise blockchain development, and custom blockchain development solutions tailored to your business needs. We also offer professional blockchain consulting to guide your projects from concept to deployment.
Additionally, our team specializes in cryptocurrency development, token development, and Solidity development, ensuring your blockchain and crypto initiatives are secure, scalable, and efficient. Have a blockchain or crypto project idea? Schedule a meeting with us today, and we’ll be happy to assist you in building your next-generation blockchain solution or developing your own crypto token.

Jay Mehta
Director of Engineering